|
Discussion rcortesi Saturday, 20 Mar 04 2:31 pm EST
|
|
This digital notebook is a way for multiple people to collaborate on any number of projects.
It started as a way for me to keep my thoughts about my projects and ideas in a single place that I could access from any computer with an internet connection. Once I went through the trouble of making a web interface, it was worth it to make the notebook handle multiple users. By handling multiple users, the notebook allows many people to collaborate on one or more projects.
The notebook is basically a multi-user, multi-topic blog, which has been designed with student projects in mind.
The notebook has the following advantages/features:
- Because the interface to the notebook is via a web browser just about any operation system (Windows, Mac, Linux, PDAs, etc.) can be used to interact with the notebook from anywhere there is an internet connection.
- The files and data are stored in a single place (the web server) allowing them to be easily archived. Currently this happens automatically every 24 hours.
- If all the notes for your thesis are kept in the notebook, when it comes time to write the thesis, they are all in one place. And they are automatically archived (see above).
- Images, spreadsheets, datafiles, etc. can be uploaded and associated with a particular topic. This files can be displayed and linked to in the entries. All of the uploaded files are archived too.
- Allows projects to be easily documented. And the documentation is around long after the project is over. This is particularly nice for student projects. Typically at the project's end when the students scatter, most of the notes scatter too.
- Access controls and permissions prevent users from seeing and editing topics they shouldn't.
- With student projects in mind, there are certain entries that only "instructors" can make, which could be used for grades, critics, etc.
- Topics can be exported as stand alone html documents.
The basic element of the digital notebook are entries.
Each entry is has a text field where its content is stored. This text is displayed as html allowing the entry to be formatted and to include links to other websites and files. Additionally each entry is assigned to a topic, to a user, and an entry type. These are discuessed below:
The user is the person making the entry. It is filled in automatically based one who is logged in to the website.
The topic is the topic to which the entry belongs. So a topic is just a collection of entries. Users can create additional topics to suit their needs. Once a topic is created entries can be added to it.
The entry type is an arbitrary description/categorization of the entry. The entry types can be added by the users to meet there needs. There is a list of default entry types available. The include things like:
- Bug to Fix
- Code Sample
- Discussion
- Online Reference
- Question
- and many more...
The notebook makes no rules about how you have to assign entry types. Only that each entry must have a type. Entry types allow you to do things like "show me all the entries in 'Roger's Cool Final Project' of type 'Phone Interview'" This would allow me to see all the notes I had taken while interviewing people over the phone in connection with my project (assuming of course that I had saved these notes in entries of type 'Phone Interview').
|
|
Discussion rcortesi Saturday, 20 Mar 04 3:12 pm EST
|
|
The main page show a listing of all the topics which you are a member of, the number of entries, date of most resent entry, your user level for each topic, and how many users are in each topic.
The main page gives you the option of view entries each topic. The page also allows you to add an entry to a topic if you are a user, administrator, or instructor for the topic.
Superusers have instructor privileges for all topics.
|
|
Discussion rcortesi Saturday, 20 Mar 04 3:14 pm EST
|
|
The "Edit User Information" page ("Edit User Info" in the menu bar) allows you to change your user information (user name, password, full name, email address).
To make any changes to your user information you must enter you current password.
An error message will be returned if you try to change your user name to one that already exits.
Additionally site superusers may use this page for:
- Create new users
- Edit any user's information. Superusers do not need to know a users password to edit a users information. This allows them to change a users password in case the user has forgotten it.
- Changing a user's site privilege level.
- Change a users status to active or inactive.
Note: User's may not be deleted (to preserve database integrity). A user's status may be made "inactive" by a superuser. When an inactive user tries to login, they are refused, until they are made active again.
|
|
|
Discussion rcortesi Saturday, 20 Mar 04 3:16 pm EST
|
|
User privileges are used to control access to the site, topics, and editing functions. There are two kinds of user privileges, site privileges and topic privileges.
Site Privilege Level:
A user's site privilege level may be set to one of the following: guest, user, or superuser.
Site Guests may only view topics. They may not add to, edit, or export topics; no matter what their topic privilege is.
Site Users, may do the following
- Create their own topics.
- View and/or add to topics depending on their topic privileges.
- Upload files to the topic.
Superusers are granted "instructor" level topic privileges for all topics in the notebook, no matter what topic privilege is actually assigned to them in the topic. Additionally they may:
- Edit other users information (including making them active or inactive and setting their site privilege level).
- Create new users.
- Assign and remove any user from any topic at any topic privilege.
- Add and edit entry types.
- View all topics in the notebook, including hidden topics.
Topic Privilege Level:
Topic privilege level control how users may interact with a particular topic. A user may be assigned one of the following possible privilege levels for a topic: guest, user, administrator, or instructor.
Topic Guests may only view non-hidden entries. They may not edit entries, upload files, view the list of users in the topic, or export the topic.
Topic Users may view entries, make entries, upload files, edit their own entries, view hidden entries in the topic, and view the names of other users in the topic. They may not edit other user's entries, or export the topic to the public directory.
Topic Administrators can do every thing a topic user can do and, add and remove users from topics, change the topic privilege level for non-instructors in the topic, and export the topic to the public directory.
Topic Instructors can do everything a topic administrator can do plus... edit any entry, add or remove any user from the topic. Change any user in the topic topics privilege level, and there are certain entry types which are only available to topic instructors (such as instructor comments).
Discussion:
So why is this privilege system so complicated? Well here are some of the thing I envision it allowing you to do.
- Most people accessing the site will be "Site Users"
- The site should have at least one "Site Superuser" to add, modify, and remove users.
- Occasionally "Site Guests" could be added too allow a person on view selected topic(s).
Each topic should have at least one topic instructor(s) who is(are) in charge of that topic. The user who creates a topic is automatically made the topic's instructor.
A topic administrator privileges could be given to one or more students, allowing them to add other students and publish the topic to the public directory, without allowing them the ability to edit other people's comments or make instructor-like comments.
I envision that most topic users are given topic user level privileges, allowing them to view the topic, make entries and upload files.
A topic guest would be for someone who you only want to view the topic.
|
|
Discussion rcortesi Saturday, 20 Mar 04 3:20 pm EST
|
|
Topic administrators and instructors may add or remove users from a topic, and change their topic privilege level by selecting "View Users in Topic" from the title bar.
The "Topic User Manager Page" displays a list of topics which you are member of. If your topic privilege level is user then you may view a list of users which are members of the topic. If your topic privilege level is administrator or instructor then you may add and remove users and change their privilege level by selecting the appropriate link.
Note: Only active users may be added to a topic.
Note: Topic administrators may not add, remove, or change the topic privilege level for a topic instructor.
|
|
|
Discussion rcortesi Saturday, 20 Mar 04 3:22 pm EST
|
|
The "Main Page" displays a list of topics to which you belong. Selecting the "View Entries" link for each topic will display the for it.
Selecting the "Filter Topic Entries" allows you to view only entries falling before, after, or between dates, by a particular user, or of a certain type.
The total number of each type of entry is displayed at the head of the page. The total number of entries made by each user is also displayed. Selecting the link on the entry type or user name will display only entries of that type or made by that user.
Selecting a link from the table of contents will take you to that entry. Only entries with a header have table of contents entries (because the header is used for the TOC entry).
If you have editing privilege for an entry, the "edit entry" link will be available to allow you to edit the entry. The "embed file" link may also be available if the topic has an upload directory.
If you are a topic administrator or instructor and the topic has hidden entries, you may view them too.
|
|
|
Discussion rcortesi Saturday, 20 Mar 04 3:23 pm EST
|
|
Threads are a way of related entries within a topic to each other. Threads are created by designating a parent entry to an entry.
Using parent and child entries to create threads provides a way of responding to, clarifying, or adding to an entry and having the whole train of thought displayed in one place.
For example, this entry is a child of the "Viewing a Topic" entry above. Even though there are several entries which were made chronologically between the "Viewing a Topic" entry and this one, these two are still displayed next to each other.
In fact, the above "Viewing a Topic" entry has two children, and this entry as a child too. You can see how they all are displayed. The topics table of contents also shows threads by indenting child entries under their parent entries.
|
|
|
Discussion rcortesi Saturday, 20 Mar 04 3:24 pm EST
|
|
To further the thread example, this entry is a child of the "Threads and Child/Parent Entries" entry above.
Threads can be create in two ways.
1) Selecting the "Add to thread" link of the entry (in the "View a Topic" page) will create a new entry which is a child of the selected entry.
2) When creating or editing an entry in the "Create or Edit Entry" page check the "set a parent entry" checkbox and selecting an entry from the "parent entry" menu.
|
|
|
Discussion rcortesi Saturday, 20 Mar 04 3:25 pm EST
|
|
Entries can be viewed by date and time or viewed by thread. When viewed by date and time the entries are displayed chronologically, and the relationship between child and parent entries is not displayed.
When entries are displayed by thread, entries are displayed chronologically but if an entry has one or more children entries, the children are displayed under the parent and indented. If an entry has multiple children, the children are displayed chronologically under the parent.
The default is to view entries by thread. This help file is an example of view by thread.
|
|
|
Discussion rcortesi Saturday, 20 Mar 04 3:28 pm EST
|
|
Entries are the basic building block of the notebook. Entries have the following fields which can be edited by the user.
- Date and Time: Any common data and time format can be used. Leave the field blank to use the current server data and time.
- Entry Type: Select one of the listed entry types which best describes the entry.
- Header: If text is entered in the header field, then is it displayed at the top of the entry and it is used as the entry's table of contents entry.
- Text: The body of the entry is entered as html.
- Hidden: Checking the "hide entry" checkbox hides the entry.
- Parent Entry: The "parent entry" checkbox and menu specifies the parent entry. Entries in the "Parent Entry" menu are in reverse chronological order (I figure you are more likely to be linking to a recent entry than an older one).
|
|
|
Discussion rcortesi Saturday, 20 Mar 04 3:31 pm EST
|
|
The text enteried in the entry is read as html. So any html tag can be used to format the entry. To make the entry bold, italics, etc.
The paragraph tag
Remember html does not break paragraphs at newline charaters so you have to use the html paragraph character p.
You can tell the digital notebook to add a html paragraph tag after each new line in the entry by checking the "Insert html paragraph tag" checkbox.
Note:If you select this option when you are editing an entry that already has paragraph tags you have two paragraph tags after each new line. This may cause browsers to display even mroe white space between paragraphs. Of course if you make a mistake you can always edit the entry and remove the extra tags.
For Example, if you entered the following text:
This is my line 1
This is my line 2
With no paragraph tag it would look like this as html:
This is my line 1
This is my line 2
However, added the html paragraph tag between the lines or selected "Insert paragraph tag, then if would look like this:
This is my line 1
This is my line 2
Now lets say you edited the entry and changed line 2, but you checked the "Insert paragraph tag" checkbox. The digital notebook would insert a second paragraph tag between the lines and your text would look like this:
This is my line 1
This is my new and improved line 2
Most (but not all) browsers will add even more white space between the lines.
The html pre tag
Don't forget about the html pre tag. If you have a lot text that you would like displayed exactly as is you can enclose it between the pre and /pre tags.
For example, you could have also entered:
This is my line 1
This is my line 2
And the output would look like:
This is my line 1
This is my line 2
|
|
Discussion rcortesi Saturday, 20 Mar 04 3:32 pm EST
|
|
Links to URLS can be easily inserted into the text. First enter the complete URL in one of the "URL" fields. If the corrisponding "link text" field is left blank the URL will be link text. Second, select where you want to place the URL in the entry by entering the corisponding tag ( _urlx_ where x=1,2,or 3). All instances of the tag will be replaced with a hyperlink to the URL. If the tag does not appear in the entry the hyperlink will be placed at the end of the entry.
For example: if you enter "http://rogercortesi.com/" in the first URL field and leave the "link text" field blank, you get this http://rogercortesi.com/ everwhere _url1_ appears in the entry.
If you had entered "http://rogercortesi.com/" in the URL field and "my web page" in the "link text" field you would get this instead my web page.
If you want to enter more than three different hyperlinks to an entry you can:
Enter the html to genterate the hyperlink yourself (a href="..." etc.) Enter the first three in the URL fields. Add the entry, and edit the entry and add three more URLs, repeated as needed.
|
|
Discussion rcortesi Saturday, 20 Mar 04 3:35 pm EST
|
|
Files can be embedded in an entry by selecting the [embed file] link in displayed with the entry.
Note:This link is only displayed if the topic being viewed has an upload directory with at least one file in it.
The Embed Image or File page gives you a menu with all the files in the topic's upload directory.
Like inserting a URL the link to the file (or the actual image) will be embedded in the text anywhere the tag _file_ appears. If you enter a link name, the link name is displayed as the hyperlink to the file, otherwise the file name is displayed.
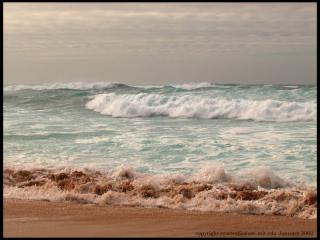
For example if I selected the file "surf_small.jpg" and entered a link name of "cool wave photo" and "Insert as an Image" checkbox was NOT checked, I would get the following:
cool wave photo
If I had done the same thing only with NO link name entered I would have gotten:
surf_small.jpg
"Hyperlink opens file in new window" checkbox does exactly that. If it is not checked the file will be displayed in the current browser window.
Now lets check the "Insert as an Image" checkbox. If a link name is entered then it becomes the caption for the image. Otherwise no caption is displayed. The image on the left is an example of an image with a caption.
The image is displayed at its actual size unless values (in pixels) are entered for height and/or width. If these values are entered the image will be resized to these dimensions.
Note: If only height or width (not both) are entered, the browser will maintain the aspect ratio of the image.
Note: Also changing the height and/or width of the image does not actually resize the file. So if you have a huge image files that is 2000x1500 pixels and you choose to enter 500x300 pixels for the new height and width, the browser will still load huge file (taking a long time to load) and then it just displays it at 500x300. So you can NOT use this feature to decrease download time.
If the "display as thumbnail" checkbox is checked, then the image is displayed with a hyperlink to the full size image. The above note about file size still applies.
The border around the image can be specified by the border field.
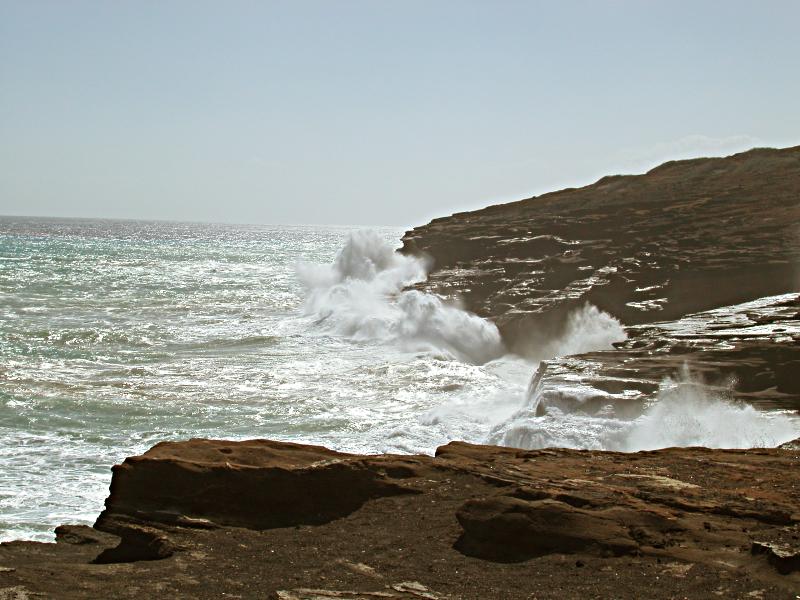
The image below is an example with NO caption (i.e. nothing entered in the link name field).
The image below is an example with a caption, resizing the image, and having the thumbnail open the full size image.
| | example of a caption and a thumbnail |
|
|
|
Discussion rcortesi Saturday, 20 Mar 04 3:36 pm EST
|
|
Files can be uploaded and associated with each topics. These files can be text files, speadsheets, images, etc. Links to these files can be placed in the entry. If the file is an image file it can be displayed in an entry.
For files to be uploaded to a particular topic, the topic must have an upload directory. Upload directories can be created and renamed using the File and Directory Manager page .
There is a limit on the maximum file size which can be uploaded. Currently it is 500 kb.
Once the topic has an upload directory you can select it to recieve files.
|
|
|
|
Discussion rcortesi Saturday, 20 Mar 04 3:37 pm EST
|
|
Topics can be created and edited by selecting "Add A Topic" from the title bar.
When a topic is created, the user which created it is automatically made a topic instructor for the topic, and an initial entry for the topic is made.
Like users and entries, topics may not be deleted permanently, but rather they are hidden. Hidden topics can only be viewed by superusers and they are highlighted in yellow on the main page.
Site users may edit any topic which they are the instructor for. This includes hiding and unhiding the topic. However if the topic is hidden and the user is not a site superuser the topic will not displayed on the main page, but the user may select the topic from the "Add A Topic" page, unhide it, and then view it.
Site superusers may edit all topics in the notebook.
|
|
Discussion rcortesi Saturday, 20 Mar 04 3:38 pm EST
|
|
If you are a superuser you may create and edit the entry types, by selecting the "Entry Type" option from the title bar. This page allows you to can change the entry type text.
Checking the "Available to Instructors Only" checkbox makes the entry type available to only topic instructors.
If you change the text of any entry type, the change will be made to all entries in notebook with that entry type.
|
|
Discussion rcortesi Saturday, 20 Mar 04 3:39 pm EST
|
|
Topic administrators and instructors may export their topic to the public directory, by selecting "Export Topic" from the title bar.
Only topics with an upload directory may be exported, because the name of the upload directory is used to name the html file and its supporting directory.
The public directory is a part of the digital notebook which does not require a login to access. If the url to the notebook is http://www.helloworld.com/notebook/ then the public directory is http://www.helloworld.com/notebook/public/
If the topic "Roger's Topic" has a upload folder named "rogerstopic", then exporting it would create the html file "rogerstopic.html" and the subdirectory "rogerstopic" in the notebook's public directory. All of the files from the upload directory for the topic are copied to the public subdirectory.
Note: If you want to copy the exported topic to a different directory or burn it to a CD to allow you display the topic else where you need to copy the html file, the subdirectory, and the file ideaspublic.css. Ideaspublic.css is the file that provides the formatting information for the html files. You can view the html files without ideaspublic.css, but they will look slightly different.
|
|