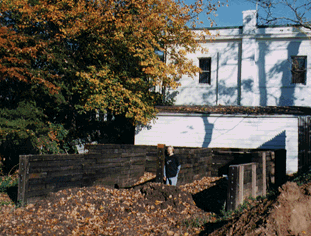
Person in photo to show scale.

Person in photo to show scale.
During the spring of 1992 (my freshman year of high school) I completed
my eagle project for the Boy Scouts of America. For my project I built a composting bin
for my school, (the Maret School, Washington DC). Below is a abridged version of my report
on this project. 
My project took place at the Maret school, located at 3000 Cathedral Ave. The project involved building a mulch and compost containment bin. This was necessary because up until now the school has been storing the mulch in large piles near the west end of the campus. There were several problems with this: first, the neighbors complained that the piles were unsightly; second, the piles did not allow for efficient composting of the mulch; and third, clay, bricks, sticks, and other garbage would get mixed in with the mulch. The solution was to build a containment bin to make the mulch less of an eyesore, promote efficient composting and keep unwanted things out. The project would also give me experience in leadership, landscaping, construction, and design; in addition to fulfilling the requirement for my Eagle.
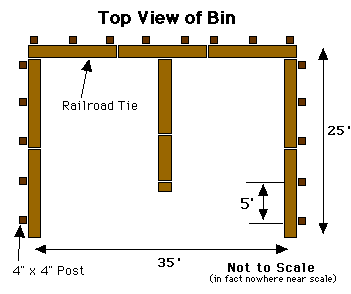
After discussing several possibilities with the Maret maintenance staff we came up with a design that met both my requirements and theirs. The main construction material would be railroad ties. The bin would resemble a large letter "E". This would give it two separate stalls, separated by a center dividing wall. The bin would be held in place by 4"x4" posts set in concrete 2 feet in the ground, they would be bolted to the outside at 5 foot intervals. The ties are staggered and held together with 8" spikes. Then it would be back-filled with dirt.
| 88 Railroad Ties 81/2' x 9"x 7" | 30 8'x4"x4" |
| 30 80lb bags of concrete | 200 lag bolts |
| 200 washers | 50 spikes |
| 2 posthole diggers | 4 shovels |
| 1 roll of string | 1 6' level |
| 1 4' level | 1 string level |
| 2 sledge hammer | 1 digging bar |
| 1 drill | 1 air ratchet |
| 1 hose | 1 hoe |
| 1 mixing basin | 1 chainsaw |
I started out by asking the maintenance staff to shift the old piles, with a Bobcat, to a separate location to clear the area . They also used it to cut into the hillside where the box would be built. After this was done, I surveyed the area where the box would be built. This was done by laying out the edge of the box with string and stakes. To ensure that all the corners were square, two more pieces of string were run diagonally across from corner to corner. If the two lengths were equal, then the corners were square. Once everything was square then the strings needed to leveled. The string was to give me a guide for laying the first layer of ties. The first layer had to be almost exactly level and true in all axis or else the rest of the wall would not be aligned correctly. In most of the first layer dirt and clay were built up to the string, however, in the middle of the left side the string (when level) was almost a whole tie height above the ground. In this case it was easier to do a little digging and insert a railroad tie below the string so that its top was level with the string.
Once the first layer of railroad ties was down they had to be leveled in the roll axis. I used a small bubble level (5²) the inside edge was lifted until the tie was level, then stones and dirt were compacted underneath the tie to hold it in place. One must be careful when doing this because the ties are rarely cut perfectly flat on the top. They usually are fairly warped so it was necessary place the level in several different places and gage it by sight to make sure the tie is level on the whole. In the original design pieces of rebar were to be placed in-between the layers of ties to allow air to circulate. This was dropped for several reasons: The ties were warped enough to provide small cracks for air to circulate, also more openings could be added by spacing the ties out
After the whole first layer was put down, holes were dug every 5 feet. Each hole was about two feet deep and 7-8 inches in diameter. Pressure treated wood posts which measured 8ı by 4² x 4² were put into each hole, and concrete was poured around them. Using a four foot level each post was checked to make sure it was vertical in both axis. The in/out axis is the important one here because if the post is not straight side to side itıs all right, but if the post leans in or out the wall will tip
Then I organized friends and scouts to come and help me stack the ties to form the wall. As the railroad ties were stacked 8" spikes where driven in to every other tie, this provided additional stability. When the wall was about half of its intended height we stopped to secure the railroad ties to the 8'x4"x4" posts. They were secured using 12" lag bolts. Pilot holes were drilled using an electric drill. Due to the size of the bolts it was impossible to get them into the ties using the gas powered drill (with a wrench bit), I turned to using an pneumatic ratchet. This got the bolts in with no problem.
The outer walls were built then the center wall was put up. Every other tie in the center wall was put through the back wall into bank behind it. On each of the open ends of the box a hole was dug and a railroad tie was set in concrete vertically. More lag bolts were run through this vertical tie and into the end of the tie forming the walls.
I had the boy use the dirt that had been excavated from the hillside to backfill the spaces behind and on the right side(looking into the box) of the wall, providing even more support.
There were many problems with this eagle project, the major one which expanded on the rest of the problems was the very nature of the project. This project required technical skill and very heavy labor. The railroad ties weigh almost 90lbs and the leveling and surveying is a long tedious process. These two combinations are not suited for calling in legions of small scouts that are usually readily available for eagle projects. So finding personnel was difficult. It was necessary for me to ask older scouts and friends from my school to help.
The surveying, measuring, leveling, and laying of the first layer was had to be explained to every body and since this was a fairly complicated process it took a surprising amount of time to have it done right. The heavy labor, stacking ties, was done by friends from school, and older scouts in the troop. The Back-filling was done by some older scouts, some younger scouts and very few friends from school.
The second biggest problem (not very far behind the first) was the amount of time needed for the project and timing of it. The project was started on the last weekend in May, it had to be finished by the first weekend in June. The reason for this was, that was when I was leaving to go teach sailing at the Nantucket Yacht Club. Since I was going away for the summer there was a definite time the project had to be finished by. The timing was not great because it also fell across exam time. This made it hard to get older scouts and friends. The other problems having to do with the timing include the fact that on several weekends the Maret maintenance staff would go out of town or be otherwise busy so I was unable to gain access to the tools and work on the project. In addition to the constrictions on available time, I grossly underestimated the time it would take to complete certain parts of the project. These included The leveling, and stacking. Also I did not take into account thing like days when it was pouring rain, or no staff was around to unlock the gates to the school or equipment room. All of these added to the delays of something that had to be done in a finite amount of time. Another technical problem was when the area was leveled it became the lowest point around, so when it rained (as it will on any scout related event) a fair amount of water would pool in the rear left-hand corner. Making to necessary to work in more then six inches of standing water in someplaces.
The success of the project was that I got the containment box strongly built, the area behind the stables and next to the field is much neater and safer for both the students that may go back there and whatever work the maintenance staff may be doing. The neighbors no longer complain about unruly piles of dirt. Most importantly, however, I learned about leadership, and gained a lot of ability to carry it out. I learned a lot of things about the planing and executing of large, onetime, projects. Including things that are unique to large, onetime projects. For example, I should have put more thought into the type of project with respect to the human resources I would have available to me. I should have given more consideration into the long term planing of time management, and what factors effect it. Examples of this include failure to remember about the effect of exams on my staffing, and that I would have a definite ending date that could not be crossed. The most important thing I learned was something that I can't quite describe, but was just experience in what works and what does not work, when leading people.
The planning for the actual design and construction was sound and the wall is extremely solid. The project was a success because of all the information I gained from it and in gave something physical and necessary to the community.